Bluegrass Star Skirt PatternBased on the Lonestar Skirtrewritten by: Kathy Somers
|
![]()
![]() The directions to make these easy, flattering and
dramatic skirts are below. These skirts are usually worn long (almost to the
ankles), although directions to shorten them are below (see **).
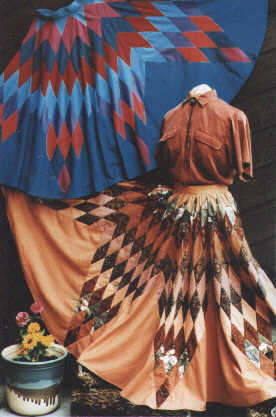
Strip-piecing is used for the star portion of the skirts. In the picture at
right, View 1 is the lower skirt and View 2 is the upper skirt.
The directions to make these easy, flattering and
dramatic skirts are below. These skirts are usually worn long (almost to the
ankles), although directions to shorten them are below (see **).
Strip-piecing is used for the star portion of the skirts. In the picture at
right, View 1 is the lower skirt and View 2 is the upper skirt.
![]() For both views, follow the steps below:
For both views, follow the steps below:
![]()
VIEW 1 (Lower Skirt):
Materials Needed:
| Blended | Reverse Repeat | ||||||||||||||||||||||||||||||||||||||
|---|---|---|---|---|---|---|---|---|---|---|---|---|---|---|---|---|---|---|---|---|---|---|---|---|---|---|---|---|---|---|---|---|---|---|---|---|---|---|---|
.
|
|
||||||||||||||||||||||||||||||||||||||
Directions For Star Points 1) Cut fabrics into 3" strips (42" or the full width of the fabric) and sew into strips sets as shown (you may need to make two of each strip set, as you will need to cut eight 45 degree strips from each). Offset each new strip by 3" to avoid waste: |
|||||||||||||||||||||||||||||||||||||||
| Blended | Reverse Repeat | ||||||||||||||||||||||||||||||||||||||
 |
 |
||||||||||||||||||||||||||||||||||||||
 |
 |
||||||||||||||||||||||||||||||||||||||
 |
 |
||||||||||||||||||||||||||||||||||||||
 |
 |
||||||||||||||||||||||||||||||||||||||
 |
 |
||||||||||||||||||||||||||||||||||||||
 |
 |
||||||||||||||||||||||||||||||||||||||
 |
 |
||||||||||||||||||||||||||||||||||||||
|
2) Press seams so they fall in opposite directions from strip to strip. Lay your 45 degree mark along a seam and cut strip sets crosswise at a 45 degree angle into eight 3" strips (you may need to make two of each strip set): |
|||||||||||||||||||||||||||||||||||||||
 |
|||||||||||||||||||||||||||||||||||||||
| 3) Sew strips into 8 diamonds as shown, being careful to offset each row by 3/8" so the seams line up when pressed: |
|||||||||||||||||||||||||||||||||||||||
| Blended | Reverse Repeat | ||||||||||||||||||||||||||||||||||||||
 |
 |
||||||||||||||||||||||||||||||||||||||
![]()
VIEW 2 (Upper Skirt):
Materials Needed:
| Blended | Reverse Repeat | ||||||||||||||||||||||||||
|---|---|---|---|---|---|---|---|---|---|---|---|---|---|---|---|---|---|---|---|---|---|---|---|---|---|---|---|
|
.
|
||||||||||||||||||||||||||
| NOTE: On Blended version, left, fabrics are numbered 1 thru 9 BUT fabric #1 will not show after the waistband is cut, so use fabric #2 (or any other fabric) for #1. | |||||||||||||||||||||||||||
Directions For Star Points 1) Cut fabrics into 3-1/2" strips (42" or the full width of the fabric) and sew into strips sets as shown (you may need to make two of each strip set, as you will need to cut eight 45 degree strips from each). Offset each new strip by 3-1/2" to avoid waste. ** NOTE: To make a shorter skirt, you can cut these strips 3" (note cross cutting directions below). This will shorten the skirt to about 27" to 28": |
|||||||||||||||||||||||||||
| Blended | Reverse Repeat | ||||||||||||||||||||||||||
 |
 |
||||||||||||||||||||||||||
 |
 |
||||||||||||||||||||||||||
 |
 |
||||||||||||||||||||||||||
 |
 |
||||||||||||||||||||||||||
 |
 |
||||||||||||||||||||||||||
|
2) Press seams so they fall in opposite directions from strip to strip. Lay your 45 degree mark along a seam and cut strip sets crosswise at a 45 degree angle into eight 3-1/2" strips (you may need to make two of each strip set). ** NOTE: If you have cut your strips 3" to make a shorter skirt, you will need to cut these strips 3", as well:: |
|||||||||||||||||||||||||||
 |
|||||||||||||||||||||||||||
|
3) Sew strips into 8 diamonds as shown, being careful to offset each row by 3/8" so the seams line up when pressed: |
|||||||||||||||||||||||||||
| Blended | Reverse Repeat | ||||||||||||||||||||||||||
 |
 |
||||||||||||||||||||||||||
![]()
When sewing diamonds together to make a star, stop and backstitch exactly 1/4" from the end of the seam and DO NOT sew into the seam allowance. Match seams carefully.
![]()
 Measure from
the inside angle of each piece to the point. Add 3 or 4 inches to the average of
these measurements and cut 4 squares that size from background fabric. Cut these
squares in half diagonally to make triangles (triangles must extend about
3" beyond the points to make a circle).
Measure from
the inside angle of each piece to the point. Add 3 or 4 inches to the average of
these measurements and cut 4 squares that size from background fabric. Cut these
squares in half diagonally to make triangles (triangles must extend about
3" beyond the points to make a circle).
To set the triangles into the inner angles, sew from the inner angles out to the points. Start the seams with a backstitch 1/4" away from the raw edges.
 Round off the
skirt, using a large compass or a string tied to a pencil (anchor the string to
the center of the skirt). Allow at least 3/4" of the background beyond the
points for hemming.
Round off the
skirt, using a large compass or a string tied to a pencil (anchor the string to
the center of the skirt). Allow at least 3/4" of the background beyond the
points for hemming.
To determine the size of the waist opening, take your waist size and divide by 3.142 (pi - π). Example: If you have a 26" waist, divide by 3.142 which gives a figure of 8.280. Rounding off, draw an 8-1/4" circle (4-1/8" radius) for the waist opening. If drawing a different size opening for lengthening or shortening the skirt, you can multiply the diameter of the opening by 3.142 to know the circumference.
With the center of the star flat, place the point of the compass in the center and draw your circle. VERY IMPORTANT!! BEFORE cutting the waist opening that you have drawn, stay-stitch on the outside of the drawn circle so will not stretch out of shape.
** Before the circle is actually cut, measure the length of the skirt. If it is longer than you want, it will be necessary to cut a larger circle. If this is done, you will have an opening larger than your waist and it will be necessary to gather the skirt onto the waistband or gather with elastic if preferred (be sure to stay stitch again if it must be cut out larger). View 1 is shown with the waist slightly gathered. View 2 is not.
![]()
Use a 7" skirt zipper. Open one of the seams seven (7) inches for the back opening. Sew in zipper using the instructions given on the zipper package.
![]()
Preferably, use the fabric that matches the top of the skirt. Cut a 5" strip that is 3" larger than your waist opening and interface it. Fold in half and sew the ends with right sides together. Turn and press. Place the right side of one side of the waistband to the wrong side of the waist opening of the skirt. Pin and sew. Turn under the second side of the waistband and press. Pin to the front of the skirt and topstitch thru all layers. Add hook and eye or buttonhole and button for a closure.
![]()
Press under 1/4" and turn up a 1/2" hem. Sew, easing in the fullness.
This is what my completed skirt looks like:


For further information, contact:
KathKwilts@KathKwilts.com
![]()
This page has been visited times since 1/6/00.
[Click HERE for LIVE Chat NOW!!!]
[ChanOps]
[Chat]
[Stats] [Schedule] [SuperChats]
[Lessons] [Links]
[Send a Quilty Postcard to your
Friends!!!]
![]()